In this guest post, Greg Benedis-Grab shares the story of when he discovered Pick’s Theorem, and how he coded an interactive version to play with.
Have you ever been intoxicated by a mathematical theorem? Well that’s what happened to a class of 9th grade geometry students at my school. Their enthusiastic teacher showed them Pick’s theorem.
“What is Pick’s Theorem?” I asked after she described the reaction of her students. So she showed me an example:
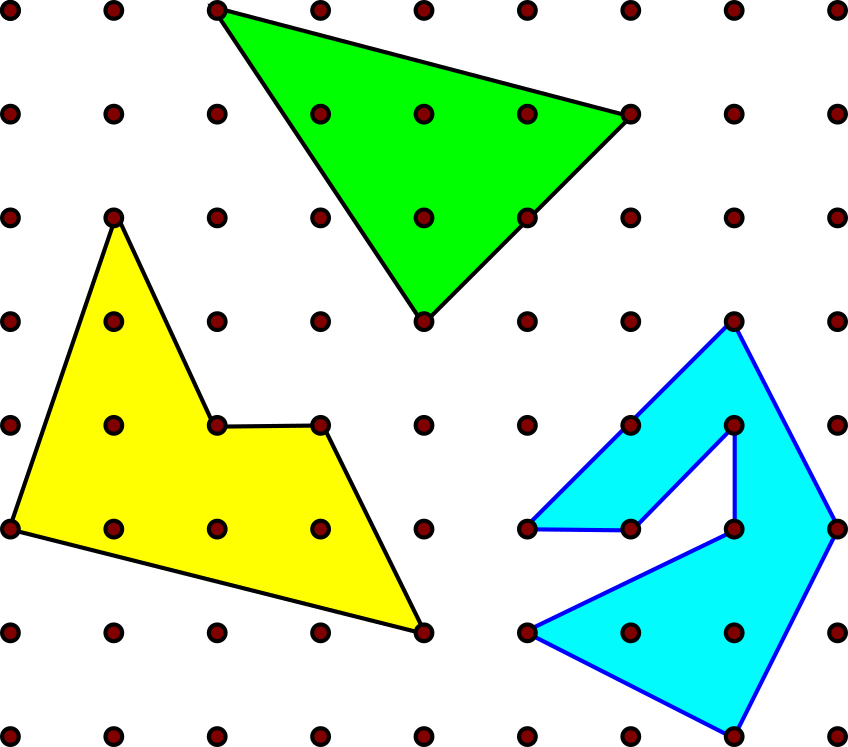
Using a lattice of nails and a rubber band, you can create geometric shapes where each vertex is located on a lattice point. As she was telling me about it I remembered this fun math manipulative from my own Elementary school days. The theorem requires you to categorize some of the lattice points as boundary points, b and interior points, i. The expression for the area is given below.
\[\textcolor{red}{i=7} \qquad \textcolor{green}{b=8}\]
\[A = \textcolor{red}{i} + \frac{\textcolor{green}{b}}{2}\ – 1 = 10\]
That is a pretty surprising result – at least, that is what the 9th grade students thought. I will leave the proof of this to the mathematicians. Here is a link to a particularly engaging mathematician doing just that. I am more interested in displaying colorful shapes in the browser so I decided it would make for a nice p5.js sketch. To get this project started I needed a very simple case. Say you have a 10×10 grid and the simplest of polygons, the triangle.
A triangle is defined by its three vertices. To organize my code I will create a Vertex class to store the x,y values for each vertex in the triangle.
class Vertex  {
  constructor(x, y) {
    this.x = x;
    this.y = y;
  }
  show(spacing) {
    fill(200); // light grey circle around each vertex
    circle(this.x*spacing, this.y*spacing,30);
  }
}
The spacing variable allows me to space out the grid points according to the window size. Next I decided to draw all the grid points on the screen.
function drawBoard(spacing) {
  stroke(0); strokeWeight(8);
  for (let i=0;i<10;i++) {
    for (let j=0;j<10;j++) {
      point(i*spacing,j*spacing);
    }
  }
}
Finally, I need to draw and fill in the triangle. I included this code in the draw loop to do so.
fill(135,180,70,100); // green
strokeWeight(2);
stroke(255,0,255); // violet
beginShape();
vertices.forEach((v)=>vertex(v.x*spacing, v.y*spacing));
let v = vertices[0];
vertex(v.x*spacing, v.y*spacing);
endShape();
I also added the ability to drag vertices to new positions. To do this I included the following methods to the Vertex class
mousePressed(mouse) {
  let pos = createVector(this.x*spacing, this.y*spacing);
  pos.add(offset); // offset allows the lattice to be centered
  if (pos.dist(mouse) < 30) {
    this.dragging = true; // assigns Vertex attribute
  }
}
update() {
  if (this.dragging) {
    let x = int(mouseX/spacing -0.5);
    let y = int(mouseY/spacing - 0.5)-1;
    if (x>=0 && x<10 && y>=0 && y<10) {
      this.x = x;
      this.y = y;
    }
  }
}
The dragging attribute indicates that one of the vertices is being dragged and should update its position with the mouse. The fact that the vertices are objects means that each of the vertex objects has its own dragging attribute and can be independently dragged. Objects will also allow me later to scale up this project to have an arbitrary number of vertices in my shape. Finally, I had to add the following functions to sketch.js in order to handle the click events. The first defines a predefined mousePressed() function that subsequently passed the mouse position to an identically named method in the Vertex class. That method checks if the mouse event occurred on the given vertex. The second removes the dragging attribute from all vertices when the mouse is released.
function mousePressed() {
  let mouse = createVector(mouseX,mouseY);
  // makes new triangle when title is clicked
  if (mouseY<0) makeTriangle();
  vertices.forEach((v)=>v.mousePressed(mouse));
}function mouseReleased() {
  for (let v of vertices)
    if (v.dragging) delete v.dragging;
}
Finally I made sure the update() and show() methods are run for each vertex object.
vertices.forEach((v)=>{
  v.show();
  v.update();
});
And that creates the following exciting web app. Go ahead and make some triangles.
Of course at this point all I have created is a triangle generator. We have not yet explored Pick’s Theorem. To do that I need to determine which lattice points are on the boundary and which points are interior. Before moving to this important step I cleaned up the code. It is important to take time to clean up your code as you expand it. Otherwise it can become unwieldy and impossible to debug. Well organized code can make complex problems simple and elegant to solve. The simplicity of the code often hides the hard work that goes into simplifying it and finding the right organization. The organization scheme serves as a foundation upon which new functionality can be built. I added a Triangle class and a Board class to modularize the program making my methods and attributes easy to manipulate.
class Triangle {
  constructor() {
    this.vertices = [];
    while(this.vertices.length<3) {
      const x = int(random(board.w));
      const y = int(random(board.h));
      const v = new Vertex(x,y);
      // only add the point if it is not on another one.
      if (!this.isVertex(x,y)) this.vertices.push(v);
    }
  }
  isVertex(i,j) {
    for (let v of this.vertices) {
      if (i == v.i && j == v.j) return true;
    }
    return false;
  }
  update() {
    this.vertices.forEach((v)=>v.update());
  }
  show() {
  // draw the triangle as shown previously
  }
}class Board {
  constructor() {} // set up board and creates a triangle obj.  showLattice() {} // draws the lattice points

  update() { this.triangle.update(); }

  menu() {} // group all the menu info together

  show() {
    this.triangle.show();
    this.showLattice();
    this.menu();
  }
}
Next I spent a fair amount of time thinking about how to mathematically define the boundary and the interior of the shape. I needed a good algorithm to accomplish this task. This is where the story gets interesting.
Computers can solve challenging mathematical problems. They perform calculations at astonishing speeds. The tricky part of this problem is that I am not sure what calculation needs to be performed. If I have a point (x,y) how will I know if it is on the boundary of my shape, inside of my shape or neither of these two conditions. To be honest I first stared at the problem for a long time. Then I noticed that the triangle has three line segments associated with it that can be drawn between pairs of vertices. These three lines can be expressed as linear equations. For points in the lattice that are located on one of the three line segments they are by definition boundary points. Checking the slope and that the points coordinates lie between the segment endpoint coordinates should be sufficient. Here is how I wrote the code.
colinear(i,j,a,b) {return (j-a.j)*(b.i-a.i) == (b.j-a.j)*(i-a.i);}

inbounds(i,j,a,b) {
    return i >= min([a.i,b.i]) &&
           i <= max([a.i,b.i]) &&
           j >= min([a.j,b.j]) &&
           j <= max([a.j,b.j]);
}isBoundary(x,y) {
  let v0 = this.vertices[0];
  let v1 = this.vertices[1];
  let v2 = this.vertices[2];
  // checks if it is on any of the 3 line segments
  return (this.colinear(x,y,v0,v1) && this.inbounds(x,y,v0,v1) ||
      this.colinear(x,y,v1,v2) && this.inbounds(x,y,v1,v2) ||
      this.colinear(x,y,v2,v0) && this.inbounds(x,y,v2,v0))
}
For the interior points I can simply check that the given lattice point satisfies the inequality for the three line segments that make up the triangle. Then I wondered, how do I know which side of the inequality is correct. The third point of the triangle, the point that is not part of the given edge should match the correct inequality for the given point. In other words if the lattice point is on the same side of the line as the third point then it satisfies that edge’s inequality. Now I just need to test all three edges and I can define the interior lattice points for the triangle. Here is how I coded this in the Triangle class.
inEq(x,y) {return (j-a.j)*(b.i-a.i) < (b.j-a.j)*(i-a.i);}

isInterior(x,y) {
  let v0 = this.vertices[0];
  let v1 = this.vertices[1];
  let v2 = this.vertices[2];
  //check that the point has the same inequality outcome as the 3rd
  //point for each of the line segments.
  return (this.inEq(x,y,v0,v1) == this.inEq(v2.x,v2.y,v0,v1) &&
          this.inEq(x,y,v1,v2) == this.inEq(v0.x,v0.y,v1,v2) &&
          this.inEq(x,y,v2,v0) == this.inEq(v1.x,v1.y,v2,v0))
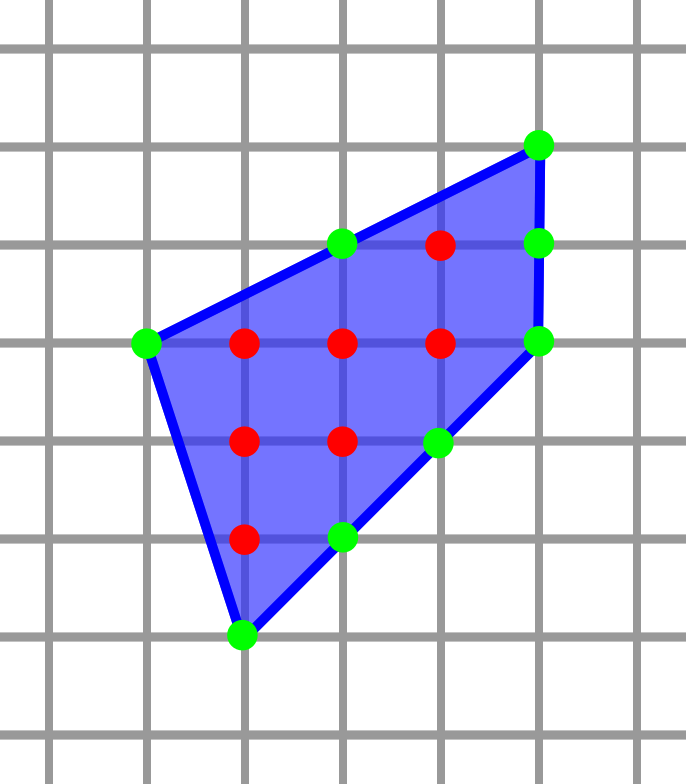
Now my app can show the number of green interior points and pink boundary points and count them on the top of the screen. I also added some animation movement to the triangle and a slider to control the speed of the animation.
This is a fun way to explore Pick’s Theorem. A teacher might use it to have students explore various triangles and see if they can come up with the theorem themselves. They can also look for patterns in the two output values to gain more insight into triangles. So one way that p5 can transform student mathematical thinking is to create a catalogue of engaging sketches such as these. Even better mathematics teachers can make their own sketches to target learning based on their knowledge about the students in their classes. For me the real learning happened when I tried to write the sketch myself. Getting the program to work deepened my level of geometric understanding and gave me an appreciation for Pick’s theorem.
Unfortunately, it is difficult to incorporate this kind of work in our high school math courses because of how much time it consumes. In addition to figuring out the mathematics I had to spend a fair amount of time debugging my code making sure that my calculations were working as expected. A number of times I had to debug the code and think systematically through the program to find my own error. The debugging process was equal in intellectual rigor to the rules I created for the inequalities. Especially since many math teachers and students are not as comfortable with coding as I am this aspect of the process could dominate and stifle the math learning. However despite these challenges I think it is still worth thinking about how we can use problems like this in math class to deepen student thinking and make the process of mathematics more playful and interactive.
The teacher who introduced this problem to me was nice enough to invite me in to her class to share my web app. I first talked to them a little about p5 and how you make shapes on the screen. Then I explained the dilemma with defining the boundary points and the interior points. I challenged them to develop their own algorithmic steps to make this determination for each lattice point. They came up with my solution very quickly. I was a bit humbled by how long it had taken me. Once they explained their algorithm I showed them how I coded it using JavaScript. They wanted to extend the idea to polygons with more than three vertices. We quickly realized that for convex polygons the same approach would work. I just had to come up with a way to handle more vertices. So I wrote the following loop to find all the edges of a polygon defined by an array of vertices. Notice that I renamed the attribute .triangle to now be .polygon
vs = board.polygon.vertices;
for (let i = 0, j = vs.length - 1; i < vs.length; j = i++) {
  // each iteration of the loop will identify a unique edge
  // defined by the points vs[i] and vs[j]
}
With this loop I can now check all the edges to see if a lattice point is a boundary point. I can also perform my inequality function on all the edges to see if it is interior (though I also need to pick one of the non-colinear points). Since I used a Vertex class to define the vertices and stored them in an array in the triangle shape it was fairly straightforward to change the name of the class to Polygon and adjust the length of the .vertices attribute in the Polygon object. By using an object oriented approach I was able to quickly scale up my idea to all possible lattice polygons.
However my definition of interior points becomes problematic when one of the vertices is concave. In that case one of the rays that extends from the edge intersects the interior of the shape making it more challenging to use the inequality to define the interior. It is possible that we can work around this using a more complex set of Boolean expressions.
Instead I shared with the class a new way to define the interior of a polygon. Ray casting is an elegant way to determine if a point is inside of a polygon. Draw a ray starting at each lattice point to infinity. If the ray passes through an odd number of edges it is interior. Otherwise it is not. If we simply draw a horizontal ray to the right we can algebraically determine the number of crossings. Here is the code I used to determine if a lattice point is inside the polygon defined by the array board.polygon.vertices
let inside = false;
vs = board.polygon.vertices;
for (let i = 0, j = vs.length - 1; i < vs.length; j = i++) {
  let xi = vs[i].i, yi = vs[i].j;
  let xj = vs[j].i, yj = vs[j].j;

  let intersect=((yi > y) != (yj > y)) &&
        (x < (xj - xi) * (y - yi) / (yj - yi) + xi);
  if (intersect) inside = !inside;
}
With this new algorithm I created a new app using the p5.js editor.

I let the class play with this new and improved Pick’s Theorem Tool. By the way I added new features so that you can click on a boundary point to make it a vertex. I also made it possible to double click a vertex to remove it. I asked them to explore different shapes and see whether Pick’s theorem always holds and to specifically find when Pick’s theorem does not work. For example if you have a complex polygon (a polygon with edges that intersect) the theorem no longer holds. I then challenged them to find a new expression for complex polygons.
This exploration led to a surprising amount of sophistication. Some students realized that the ray casting rule did not always exactly match the way p5 filled a polygon shape. I might want to explore p5’s algorithm to see how it is defined. Another student noticed that sometimes a ray from an interior point can pass through a vertex and one side of a polygon. This raises an important idea about what it means to pass through an odd number of edges. Additional students worked on coming up with a new algebraic Pick’s expression for complex polygons.
To finish off this article I decided to pursue the intersection between aesthetic beauty and mathematical expression. I decided to create rays that travel across the screen along horizontal paths. Every time the ray passes through a lattice point it will determine how to classify it based on the logic described above – if it lies on the line segment of an edge, it is filled with pink, and if it has passed through an odd number of edges then it is green. Otherwise it is filled with black.
I gave the sketch a radar-like aesthetic, where defined lattice points slowly fade after they are marked. I also lit up the edges as the rays crossed them. Finally I made the polygon randomly transform over time creating a hopefully pleasing dot pattern progression. I will not explain this code in depth, but it is accessible through the glitch sketch linked below.
One Response to “Coding Stories: Programming Polygons”